
One of the most overlooked areas of eCommerce websites is the product photography. Some consider it a necessary evil, some hire a student to take 1000 photos on their iPhone, and some invest a fortune in creating a stunning portfolio.
Whichever one is you – you cannot deny that great eCommerce photography brings a website user closer to the items itself – the grain of the wood, the stitching of the collar, the shade of blossom pink.
So why do so many eCommerce brands fail to take their photography seriously?
Cost and time.
The Cost of your Product Photography
Picture the scene.
You’ve got 1000 new items to photograph and upload by the end of the week.
You’ve worked out that paying a professional photographer £350/day will become mind-blowing expensive.
If the photographer can take 60 good shots per day, that’s 16 production days which equals £5833. Then you have to upload them individually to each item in your database and test the front end site for errors. Oh, and there’s SEO concerns too for page speed.
You’d be easily looking at a £10,000 investment – or £10 per shot.
Yet there are perfectly good ways to reduce that cost significantly, as well as speed up delivery time.
Get the process right – like Henry did
Whether you like it or not, you’re going to need to click a camera shutter button 1000 times.
Yet there are ways to improve the photo setup – placing of product, the lighting, the removal of product – to make it more rapid and therefore cost efficient.
Think like Henry Ford.
The inventor of mass production lines knew about process – one place to create the chassis, one place to attach the wheels and one place to paint the car.
- Unbox everything and line your products up in an orderly fashion. Don’t worry about how long the line is – you want to take lots of photos in one go.
- Spend 10min watching this video about putting your product at an attractive angle
- Don’t worry too much about the background or messy edges to the shot (see below for our app hack)
- Buy a cameraphone tripod to maintain consistent positioning.
- Use a great quality mobile phone for photos, and apply any filters beforehand
- Buy a £35 LED light to boost lighting for necessary detail
- Shoot your shots!

Post processing apps – the real time saving hack
Here we go – the tips and hacks your came for
The great thing about today’s world is someone has already felt your pain and built an app for it. Here come the genius recommendations:
Remove backgrounds in an instant
For standard ecommerce product photos you likely want to strip out the background noise and colour, and deliver your shots on either a vector or a particular colour backing.
 |
One image free, as low as 12p each for 1000 images Loads of cool integrations and possibiltiies with their Android app, Google Drive/Photos connection and plenty more |
 |
50 images free, £29/mth (x300), £89/mth (x1200) Simply upload a file (or enter a url) and wait a few seconds whilst the background is miraculously and sharply stripped away. |


Once the photo background has been stripped away, you can apply a new one – either a monotone colour (think beige or white), or even another photo.
Resizing many product photos in one go
The right click menu is a godsend for many digital workers – but did you know you can customise the options offered?
You can add the ability to resize multiple product images in one go – like this:
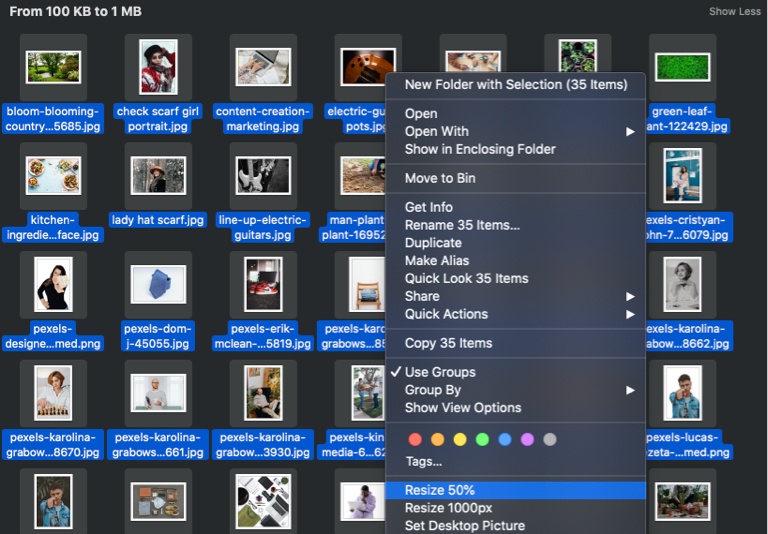
Mac: How to Quickly Resize Images on Your Mac Using an Automator Service
Batch brightness and contrast processing
A big delay in working with your product images is processing 1000 images individually.
Using an app to change the look
Once you’ve copied them onto your laptop (Google Drive, for example), group them up into which need better brightness or contrast, stronger exposure or perhaps simply flipping horizontally.
Then use an online app like PineTools to match process that subfolder with the action you want – they offer plenty.
Download those images to a sister subfolder so you know which ones have been processed.
Using CSS to process all or some images
When you’ve finished everything and are checking over the site’s front end, you may spot a few images that would be better with a stronger brightness, or need a drop shadow.
In CSS you have inline (or custom.css) commands like
- filter: brightness(10)
- filter: opacity (0.5)
- filter: saturate (30)
which offer easy image manipulation on the fly – far better than re-editing the image offline and uploading it again. For a full set of commands see the W3Schools help guide.
Product Photography Improvements – Summary
There you have it.
With some affordable equipment, a good smartphone and a clear process for mass production, you can capture the best parts of 1000 products in under a week.
And when you consider that those products might be available on your site for another 3 years, it’s a sensible investment of time and money to make.

As the Founder of Shopit, Adam drives the overall vision and responsibility for the company. He maintains contact and links with many clients in order to understand how best to evolve the Shopit platform